6 min to readCloud ServicesPublisher Advisory Services

How to connect an ESP32 device to AWS IOT and store the incoming data into AWS Timestream using Terraform and Arduino IDE

hristo-ivanov-contact
Hristo IvanovSenior Cloud Infrastructure Engineer
An aerial view of a train track in a city.

Introduction

In this modern age, everything around us has some type of processor that makes it smarter. Although this was probably not meant for all the devices, with the advancements in technology and the cloud at our disposal, we can start taking advantage to help our business, create a smart home or some simple project for our personal hobbies.

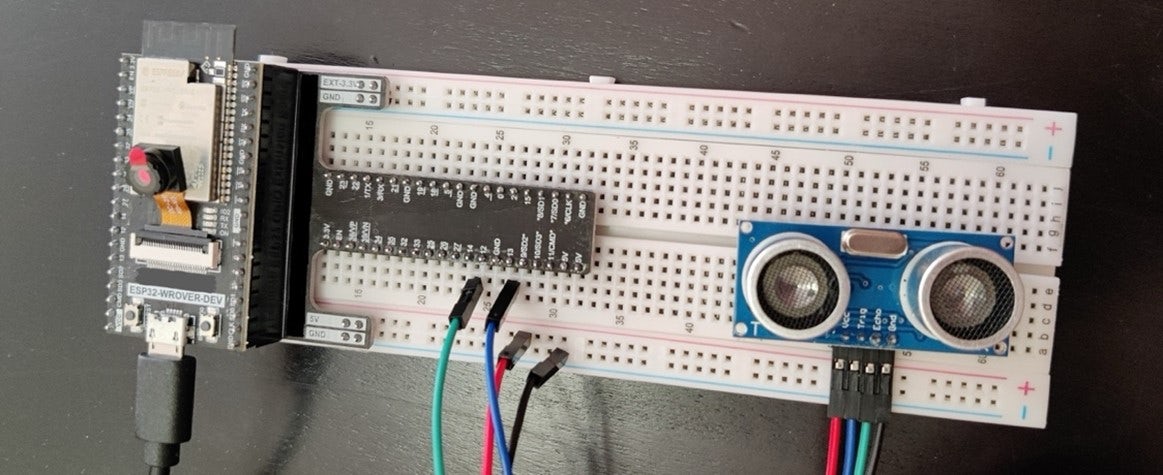
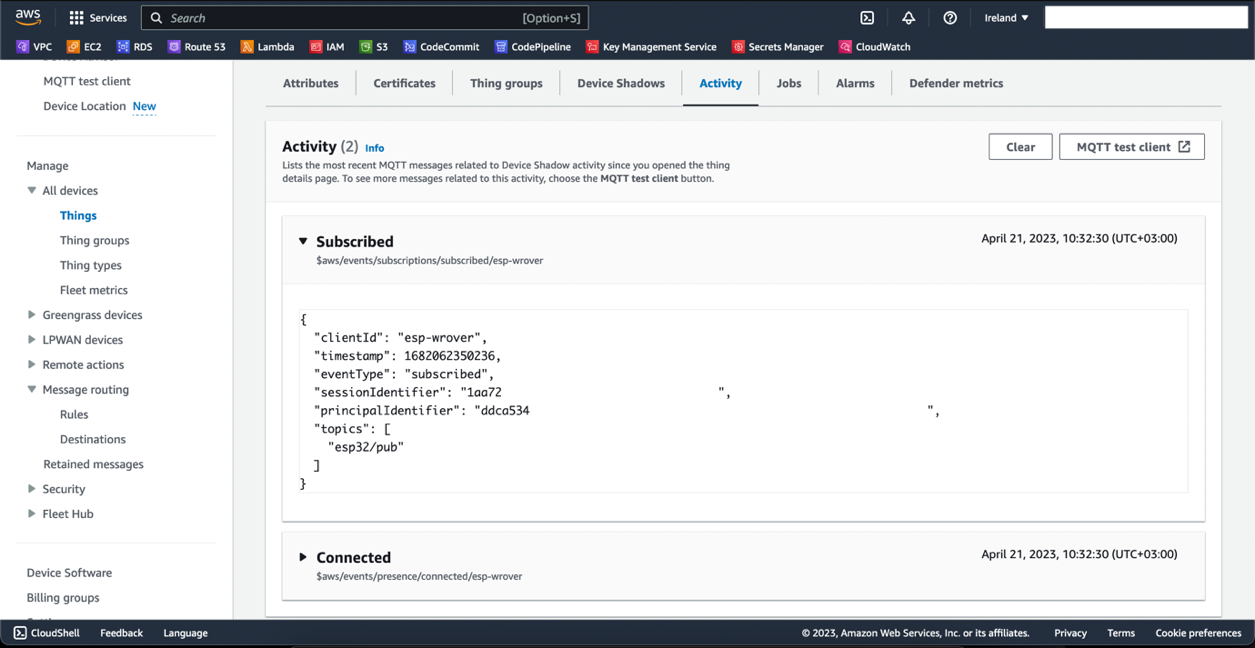
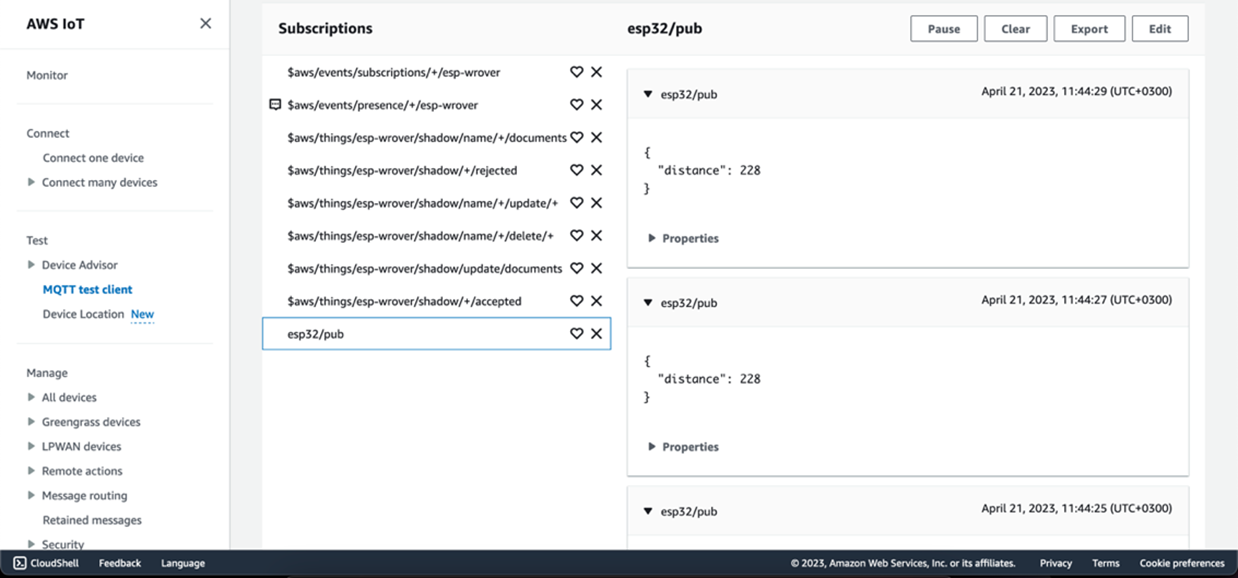
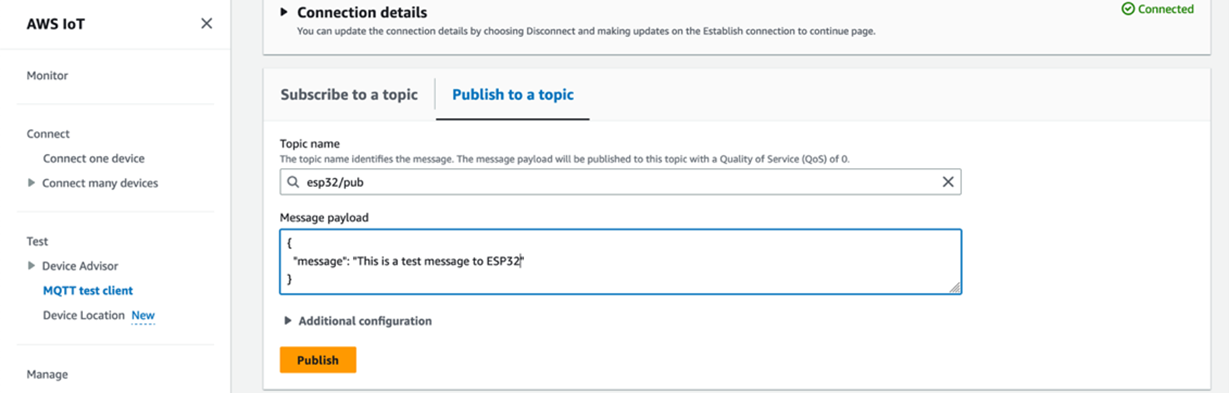
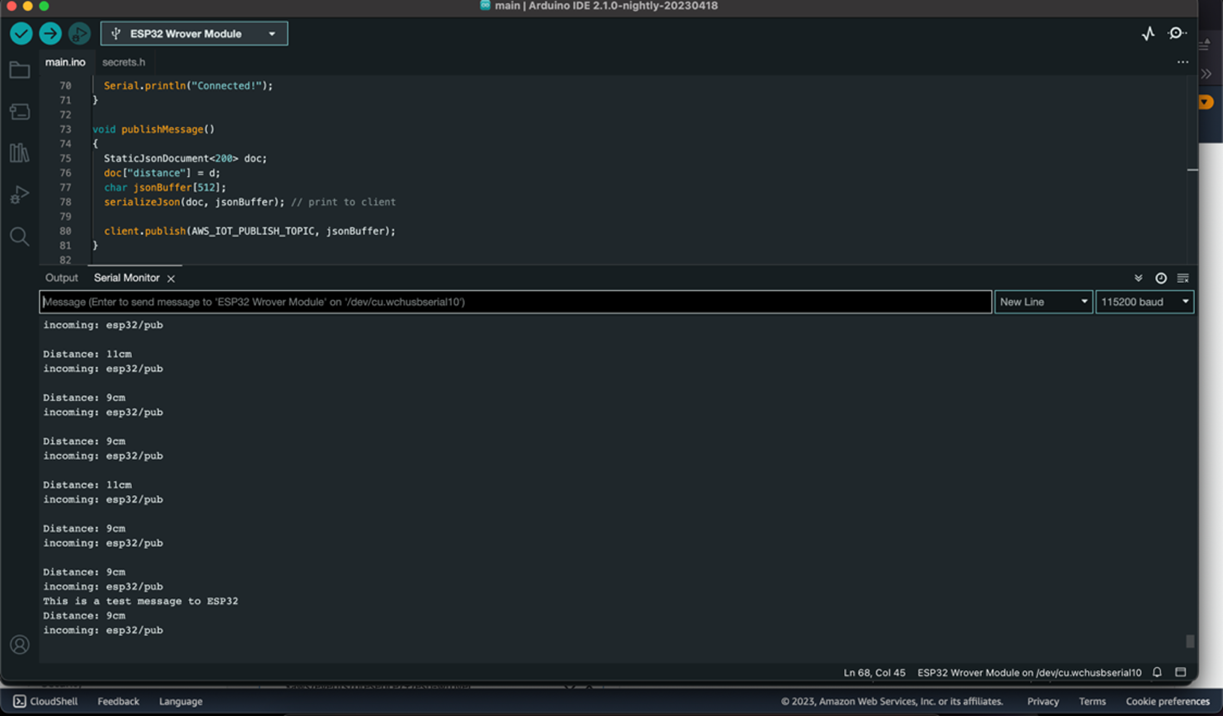
Going over the problem at hand, can we effectively introduce infrastructure-as-a-code to automate the manual steps with the creation of IOT thing, connecting an ESP32 microcontroller with an Ultrasonic Distance Sensor (used for measuring the distance of an object in front of it) to the cloud and then ingesting all the collected data into Amazon Timestream a fast scalable time-series database? And the answer is yes!

We will be using Terraform to create IOT Core, and then connect our device to the cloud, which in term will allow us to route messages through IOT Topic Rules and store the data into our Timestream Table.

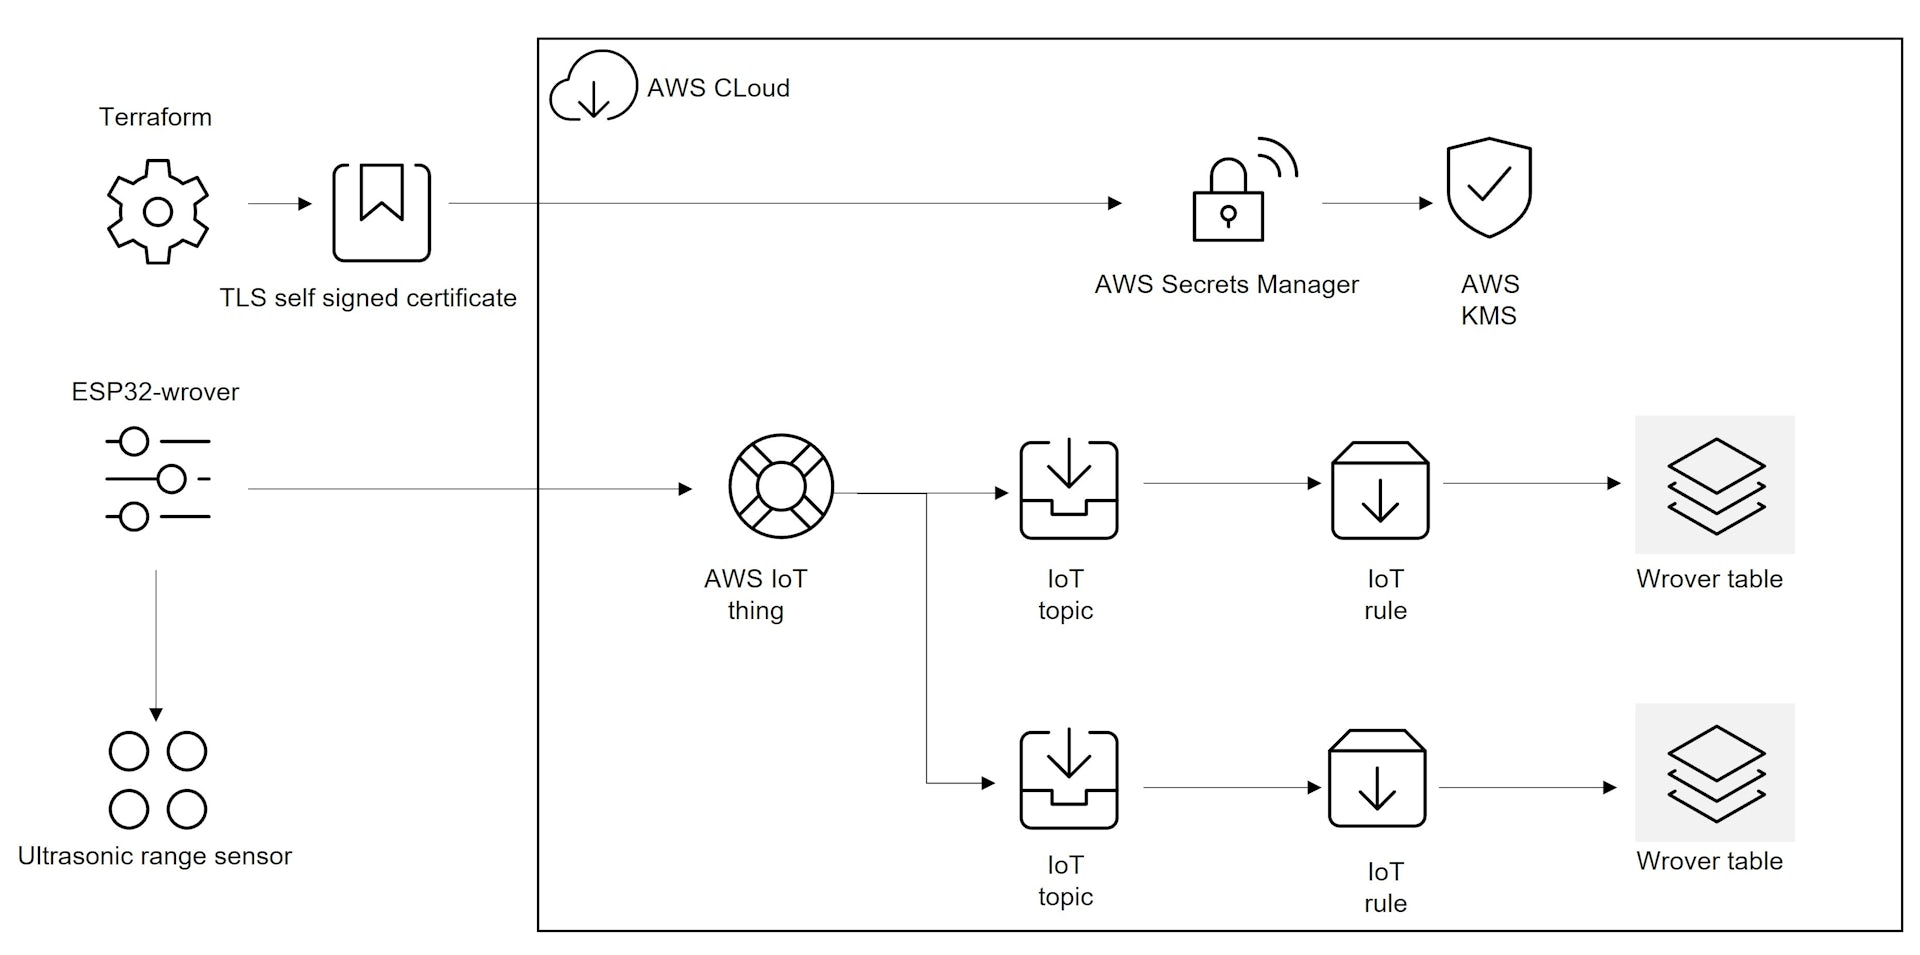
To have a better grasp of what we must accomplish here is a diagram for our little project:

source: AWS

Prerequisites:

  • ESP32 development board with Wi-Fi, can be found on amazon.
  • Ultrasonic Sensor – also found on amazon.
  • Breadboard with a jumper wire set - amazon.
  • AWS account – more details here.
  • Installed and configured Terraform, including the needed providers.

Steps:

  1. Generating certificates.
  2. Create an IOT thing.
  3. Create an Amazon Timestream DB and Table.
  4. Create a set of IOT Rules to send the incoming data from ESP32 device to the database.
  5. Prepare your ESP32 device and attach the ultrasonic sensor to it.
  6. Connect the ESP32 device to AWS IOT Core.
  7. Test the Solution.

The infrastructure

First, we need to lay down the foundation without which we cannot proceed. In our case the foundation itself is the Certificate, which is crucial for this project. We will use Terraform to create the TLS certificate. This is an important step as without it our device wouldn’t be able to connect to AWS IOT. For this purpose, we will need to use the “tls provider” and create a private key, from which we will generate a self-signed certificate. The AWS root CA1 certificate can be extracted with a data source:

1. Generate certificates

resource "tls_private_key" "rsa_private_key_example" {
algorithm = "RSA"
rsa_bits  = 4096
}

resource "tls_self_signed_cert" "device_certificate_example" {
private_key_pem = tls_private_key.rsa_private_key_example.private_key_pem
validity_period_hours = 8766
allowed_uses = []
subject = {
organization = “esp32”
}
}

resource "aws_iot_certificate" "certificate" {
certificate_pem = trimspace(tls_self_signed_cert.device_certificate_example.cert_pem)
active          = true
}
data "http" "aws_root_ca_one" {
url = "https://www.amazontrust.com/repository/AmazonRootCA1.pem"
}

Having certificates generated by Terraform is great, but they must be stored in a secure location. We will use Secrets Manager for this purpose and use custom KMS keys to encrypt those secrets:

Secrets Manager:

### Root CA

resource "aws_secretsmanager_secret" "iot_root_ca" {
  name                    = /iot/things/root_ca1"
  kms_key_id              = aws_kms_key.secrets_kms_key.id
  recovery_window_in_days = 0
}

resource "aws_secretsmanager_secret_version" "iot_root_ca_version" {
  for_each      = var.iot_core
  secret_id     = aws_secretsmanager_secret.iot_root_ca.id
  secret_string = data.http.aws_root_ca_one.response_body
}

### Private Key

resource "aws_secretsmanager_secret" "iot_private_key" {
  name                    = "/iot/things/private_key"
  kms_key_id              = aws_kms_key.secrets_kms_key.id
  recovery_window_in_days = 0
}

resource "aws_secretsmanager_secret_version" "iot_private_key_version" {
  for_each      = var.iot_core
  secret_id     = aws_secretsmanager_secret.iot_private_key.id
  secret_string = tls_private_key.private_key.rsa_private_key_example
}

### Certificate

resource "aws_secretsmanager_secret" "iot_certificate" {

  name                    = “/iot/things/certificate"
  kms_key_id              = aws_kms_key.secrets_kms_key.id
  recovery_window_in_days = 0
}

resource "aws_secretsmanager_secret_version" "iot_certificate_version" {
  for_each      = var.iot_core
  secret_id     = aws_secretsmanager_secret.iot_certificate.id
  secret_string = tls_self_signed_cert. device_certificate_example.cert_pem

Encryption using KMS:

resource "aws_kms_key" "secrets_kms_key" {
  policy = templatefile("${path.module}/policies/secrets_manager_kms_key.json", {
    account_id      = data.aws_caller_identity.current.account_id
    deployment_role = data.aws_caller_identity.current.arn
  })
}

resource "aws_kms_alias" "secrets_kms_alias" {
  target_key_id = aws_kms_key.secrets_kms_key.id
  name          = "alias/secrets-manager-cert-kms-key"

KMS Policies:

{
    "Version": "2012-10-17",
    "Id": "key-default-1",
    "Statement": [
        {
            "Sid": "KMSAdmin",
            "Effect": "Allow",
            "Principal": {
                "AWS": "arn:aws:iam::${account_id}:root"
            },
            "Action": "kms:*",
            "Resource": "*"
        },
        {
            "Sid": "Allow use of the key",
            "Effect": "Allow",
            "Principal": {
                "AWS": "${deployment_role}"
            },
            "Action": [
                "kms:Encrypt",
                "kms:Decrypt",
                "kms:ReEncrypt*",
                "kms:GenerateDataKey*",
                "kms:DescribeKey"
            ],
            "Resource": "arn:aws:secretsmanager:eu-west-1:${account_id}:secret:/iot/thing/*"
        }
    ]
}

2. Create an IOT Thing

Now that we have our secrets safely stored and encrypted in Secrets Manager, we can focus on creating the IOT part. This includes the IOT thing, the principal attachment for the certificate and a policy setting the permissions for the device to be able to connect, receive, subscribe, and publish:

resource "aws_iot_thing" "thing" {
  name     = "esp-wrover"
}

data "aws_caller_identity" "current" {}

resource "aws_iot_thing_principal_attachment" "attachment" {
  principal = aws_iot_certificate.certificate.arn
  thing     = aws_iot_thing.thing.name
}

resource "aws_iot_policy" "policy" {
  name     = "esp-wrover-iot-policy"

  policy = templatefile("${path.module}/policies/iot_thing_policy.json", {
    region     = "eu-west-1"
    account_id = data.aws_caller_identity.current.account_id
  })
}

resource "aws_iot_policy_attachment" "attachment" {
  policy   = aws_iot_policy.policy.name
  target   = aws_iot_certificate.certificate.arn
}
IOT Policy:
{
  "Version": "2012-10-17",
  "Statement": [
    {
      "Effect": "Allow",
      "Action": [
        "iot:Connect
      ],
      "Resource": "arn:aws:iot:${region}:${account_id}:client/esp-wrover"
    },
    {
      "Effect": "Allow",
      "Action": [
        "iot:Subscribe",
        "iot:Receive",
        "iot:Publish"
      ],
      "Resource": "arn:aws:iot:${region}:${account_id}:topic/esp32/pub
    }
  ]
}

Creating the Certificate, Secrets Manager and the IOT Thing with its policies is enough for our device to make a successful connection to AWS, however we will go a step further and create a Timestream Database to store our incoming data from the EPS32.

3. Timestream Datebase and table

Setting the name of the Database to “esp-wrover” and the table to “distance” which will store the data from the Ultrasonic distance sensor, this way if we decide to add another ESP32 wrover device, we will just create a new table with a different name.

resource "aws_timestreamwrite_database" "esp32_timestream_db" {
  database_name = "esp-wrover"
  kms_key_id    = aws_kms_key.timestream_kms_key.arn

  tags = {
    Name = "esp-wrover"
  }
}

resource "aws_timestreamwrite_table" "distance_timestream_table" {
  database_name = aws_timestreamwrite_database.esp32_timestream_db _timestream_db.database_name
  table_name    = "distance"

  retention_properties {
    magnetic_store_retention_period_in_days = 30
    memory_store_retention_period_in_hours  = 8
  }

  tags = {
    Name = "distance"
  }
}

For the Topic Rule, start by creating an IAM role with the following policy:

{
    "Version": "2012-10-17",
    "Statement": [
        {
            "Effect": "Allow",
            "Action": [
                "timestream:WriteRecords"
            ],
            "Resource": "arn:aws:timestream:REGION:ACCOUNT_ID:database/esp-wrover/table/distance"
        },
        {
            "Effect": "Allow",
            "Action": [
                "timestream:DescribeEndpoints"
            ],
            "Resource": "arn:aws:timestream:REGION:ACCOUNT_ID:database/*"
        }
    ]
}

4. IOT Topic Rule

We should call the rule “distance”, this with the Timestream table will be easily distinguished if there are more rules added in the future. For dimensions we will once again use “distance”, and “$${distance}”. Now that we have a rule, we can deploy our code using Terraform, and configure the ESP32 device to connect to AWS.

resource "aws_iot_topic_rule" "rule" {
  name        = "distance"
  description = "distance from esp32"
  enabled     = true
  sql         = "SELECT * FROM esp32/pub"
  sql_version = "2016-03-23"

  timestream {
    database_name = “esp-wrover”
    role_arn      = “arn:aws:iam::ACCOUNT_ID:role:timestream-role”
    table_name    = “distance”
    dimension {
      name  = "distance"
      value = "$${distance}"
    }
  }
}

5. Configure IDE and ESP32 device

image2

I am using an ESP32 wrover device with Ultrasonic Range Sensor attached. Since we have a breadboard no soldering is involved into this project, instead the jumper cables must be inserted into the correct pins as follows:

  • Black = Ground: should be negative ground sockets
  • Green = Echo: added to pin 14
  • Blue = Trigger: inserted to pin 13
  • Red = VCC: should be connected to the positive 5v socket

Out of the box the microcontroller is empty, so it has to be flashed with our code, in order to serve it’s purpose. This can be done using the Arduino IDE which has support for ESP32.

First, let’s install Arduino. The package can be found on the Arduino web page .

Then, we need to configure Arduino to use ESP32 as it is not present by default.

This is done from Preferences -> Settings, and we need to add the following link:

https://dl.espressif.com/dl/package_esp32_index.json

image 3

And last, we need to install ESP32 from Tools > Board Manager.

6. Flashing the ESP32 device

The code in this example is written in C. Depending on the provider of your device, additional templates could be found on their web portals, that is why we are going to be focusing mainly on the code for connecting to AWS.

Next, we will need a file to store our secrets called “secrets.h”:

include <pgmspace.h>

#define SECRET
#define THINGNAME "esp-wrover" // update this with your thing name

const char WIFI_SSID[] = "wifi_ssid"; // update this value with the wifi ssid or the network you are going to use.
const char WIFI_PASSWORD[] = "wifi_password"; // update this with the wifi password.
const char AWS_IOT_ENDPOINT[] = "123456.iot.eu-west-1.amazonaws.com"; 
// example you need to update this with the device data endpoint found under settings in the IOT console. // Amazon Root CA 1 static const char AWS_CERT_CA[] PROGMEM = R"EOF( -----BEGIN CERTIFICATE-----
// add AMAZON ROOT CA1, downloaded during the thing creation. -----END CERTIFICATE----- )EOF"; // Device Certificate static const char AWS_CERT_CRT[] PROGMEM = R"KEY( -----BEGIN CERTIFICATE-----
// add Device Certificate, downloaded during the thing creation. -----END CERTIFICATE----- )KEY"; // Device Private Key static const char AWS_CERT_PRIVATE[] PROGMEM = R"KEY( -----BEGIN RSA PRIVATE KEY-----
// add Private Key, downloaded during the thing creation. -----END RSA PRIVATE KEY----- )KEY";

We will need to include secrets.h and several additional libraries. This can be accomplished from the “main.ino” file:

#include "secrets.h"
#include <wificlientsecure.h>
#include <pubsubclient.h>
#include <arduinojson.h>
#include "WiFi.h"

#define AWS_IOT_PUBLISH_TOPIC   "esp32/pub"
#define AWS_IOT_SUBSCRIBE_TOPIC "esp32/pub"

WiFiClientSecure net = WiFiClientSecure(); 

PubSubClient client(net);

WiFiClientSecure.h and WiFi.h are needed for connecting to the Wi-Fi network.

ArduinoJson.h will help us with serialization, deserialization, messagepack, filtering and so on.

The MQTT library needs to be installed first, there are a lot of libraries for this purpose some of them are: “MQTT”, “PubSubClient.h” and so on. In this example, we will use the latter, as it has a better integration with the referenced device. To install those libraries, we will need to go to Library Manager, find the desired library in the search engine and install it:

void connectAWS()
{
  WiFi.mode(WIFI_STA);
  WiFi.begin(WIFI_SSID, WIFI_PASSWORD);

  Serial.println("Connected to WiFi Network");

  while (WiFi.status() != WL_CONNECTED)
  {
    delay(500);
    Serial.print(".");
  }
  // WifiClientSecure
  // Configuration for AWS IOT device secrets
  net.setCACert(AWS_CERT_CA);
  net.setCertificate(AWS_CERT_CRT);
  net.setPrivateKey(AWS_CERT_PRIVATE);

  // AWS IOT ENDPOINT
  // Connect to the MQTT broker on the AWS endpoint we defined earlier
  client.setServer(AWS_IOT_ENDPOINT, 8883);

  // Message handler
  client.setCallback(messageHandler);

  Serial.println("Connecting to AWS IOT");

  while (!client.connect(THINGNAME))
  {
    Serial.print(".");
    delay(200);
  }

  if (!client.connected())
  {
    Serial.println("AWS IoT has Timed out!");
    return;
  }

  // Subscribe to an AWS topic
  client.subscribe(AWS_IOT_SUBSCRIBE_TOPIC);

  Serial.println("Connected!");

The following function is used to convert the message to JSON before we publish it to the topic:

void publishMessage()
{
  StaticJsonDocument<200> doc;
  doc["distance"] = d;
  char jsonBuffer[512];
  serializeJson(doc, jsonBuffer 

  client.publish(AWS_IOT_PUBLISH_TOPIC, jsonBuffer);
}

After this step, we must add several more lines of code configuring our ESP32 device for the task at hand. In our case, the sensor will detect the distance of an object in front of it, which will then be displayed in the serial console and will be published to esp32/pub topic. Thus, the code must have the “connectAWS();” function, otherwise the device will not connect to AWS IOT.

Once the code is compiled and uploaded to the device, the messages are going to be transmitted in the serial console and AWS IOT as seen below:

Connected to WiFi Network
……Connecting to AWS IOT
Connected!
Distance: 228cm
incoming: esp32/pub

Distance: 123cm
incoming: esp32/pub

Distance: 28cm
incoming: esp32/pub

Distance: 13cm
incoming: esp32/pub

Distance: 58cm
incoming: esp32/pub

Verify Connection:

image 4

7. Testing

Okay so far so good, but how can we be sure that the topic receives our messages, this can be tested via the “MQTT test client” in the IOT Core dashboard and subscribing the client to the topic, in our case esp32/pub.

image 5

This is great, we are receiving MQTT messages from our device, Next step is to publish to the serial console:

image 6

And the result:

image 7

The final step will be to test if the IOT rule is redirecting the messages correctly to the Timestream Table. For this purpose, we will use the build in query editor in the Timestream dashboard. Once there, select the “distance” table and in the field type the following SQL statement and run the query:

SELECT * FROM ‘wrover’.’distance’
image 8

We have successfully routed our messages to the timestream table. This concludes our little project as a success.

Conclusion

Finishing this fun endeavor, shows us that we can effectively automate and use infrastructure-as-a-code tool like terraform to deploy IOT Core resources and their peripherals in AWS, meaning we are no longer bound to creating those resources manually but instead, can introduce an automation in our workflow. Furthermore, with the introduction of AWS Timestream, our ESP32 data is now securely stored in the cloud, and ready to be processed.


An aerial view of a green field and a road.

Want to know more?

Get cloud guidance from the pros. Contact us today to schedule a free 30-minute consultation with one of our cloud experts.

Want to know more?

Get cloud guidance from the pros. Contact us today to schedule a free 30-minute consultation with one of our cloud experts.

Author

hristo-ivanov-contact

Hristo Ivanov
Senior Cloud Infrastructure Engineer