SoftwareOne logo

10,5 min to readDigital Workplace

Teams tutorial: Managing your audio and video settings in Microsoft Teams

Erik Moll, SoftwareOne blog author
Erik MollGo-to-Market Manager - Americas
Woman meets with colleagues virtually

As businesses embrace remote work, you could say videoconferencing is having its moment. This is much more than just a “moment,” however. Even as the world begins to adjust to a new normal, the remote workforce is likely to persist. According to Gartner, 41 percent of employees now plan to work remotely at least part-time, up from 30 percent just last year.

Going forward, we predict videoconferencing will become a permanent fixture for most businesses. What this entails is a very large number of people not only changing the way they work, but also transforming the way they communicate and collaborate.

For companies with Microsoft 365, that means making the most of their Teams deployment. Let’s take a look at how businesses can make the most out of their Teams deployment through managing their audio and visual settings. After having started with how to create a meeting invite from and for Teams and how to select the right headset for your users it’s now time to have a more detailed look at the audio and video settings in Teams.

Getting the most out of Microsoft Teams

Teams is Microsoft’s holistic collaboration platform within Microsoft 365 used for chats, meetings, calls, and events. It is as easy to use as it is powerful. Nevertheless, we could all use a little brushing up on the settings from time to time. That is especially true when it comes to the audio and video settings. For everyone who has ever asked, "Can you hear me?" or "Who just joined?", or who cannot quite get the hang of muting their microphone, here are some basic tips.

3 Important audio and video settings to know in Microsoft Teams

Abraham Lincoln once said, “Give me six hours to chop down a tree and I will spend the first four sharpening the axe.” For good video chats, meetings, or events on Teams, preparation is key. The good news: it should not take you four hours to get ready for your next team chat – just a few minutes dedicated to learning these basics.

1. Get a good set of headphones

Before you start calling in Teams, connect a set of headphones. You will get far superior sound quality when compared to the onboard audio hardware that came with your computer or mobile device. Headphones also help block out the ambient noise around you, so you will not be distracted by a large garbage truck rolling by your window or when the beeping from the microwave indicates that your spouse’s microwave popcorn is ready.

Headphones typically have a built-in microphone so they may double as a headset. However, double-check before purchasing a new pair of headphones to ensure that they have a high-quality microphone. By default, your headphone microphone is closer to your mouth than the one that came with your computer, and can filter out more senseless noise. Even if you use a mobile phone, the microphone on a headset will give clearer audio quality, helping your colleagues hear everything you say.

Through the combined forces of proximity and higher quality electronics, a headset or quality pair of headphones just gives better results, any way you look at it.

2. Make a test call

Videoconferencing is supposed to increase productivity, not cause IT headaches. Leaving things to chance without testing your settings is a good way to encounter unexpected errors and create delays for everyone attending the meeting. Therefore, it is always a good idea to make a test call before your actual meeting takes place.

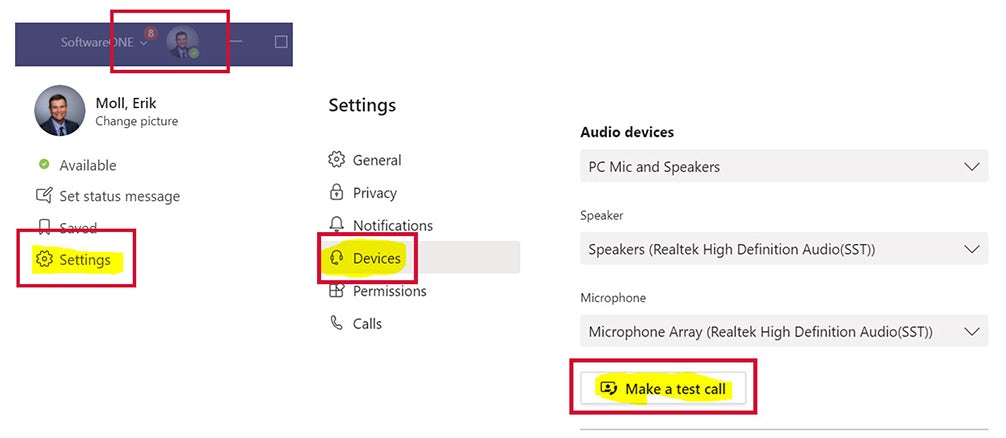
Here is how you do that: Open the Teams desktop app in advance if you are not using your phone for the meeting.

  • Click your name, which appears in the upper right-hand corner.
  • Choose settings, which is represented by a gear icon.
  • A pop-up should appear in the Settings menu.
  • Toward the bottom of the menu you will find Devices. Click that and you are almost ready to perform your test call.
Access your Teams settings make a test call, source: SoftwareOne

Finally, click Make a test call. Teams will now test the performance of your headphones, returning nicely-formatted results in four areas. It checks the status of the following components and identifies them by name so you can make any necessary adjustments: Microphone, Speaker, Camera, and Network.

3. Turn on your video – but beware of the background traps

We all have been here before – jumping on a meeting, turning on video and not really thinking about what is showing behind you. Do you remember the interview with Professor Robert Kelly that went around the world making people laugh about his kids crushing on the scene in the background? What seems to be so funny at the first glance can soon turn out as a high business risk when you are accidentally exposing sensitive data or sharing information that could reveal details about the place you are actually living and working. To avoid such exposure Teams comes with some more features that helps you to feel more comfortable during meetings and keeping your environment personal and secure.

Start by joining a Teams meeting from your desktop or mobile application and go to the bottom of your screen where you will find the three dots that opens up additional settings. Select More actions > Show background effects. There, you can either chose Blur to blur your background, or choose from the available images to replace it. Once you have decided for a layout you will be able to preview your settings in the preview window. If you like what you see just hit Apply. That’s it.

Edit the Teams Meeting background settings, source: SoftwareOne

Microsoft furthermore just made available to also add customized images to the library. With this setting you can then also add company backgrounds or images of your choice to make every meeting not just a fun one – but also a secure one not disclosing any personal information.

4. Know what to do when people cannot hear you

Your test call should pinpoint any audio or video problems with your device configuration in Microsoft Teams - but what happens if you need to fix something on the fly? If you are already in a meeting and people cannot hear you, chances are one of two things is happening:

  1. You are muted.
  2. Your microphone is not configured correctly.

For the former, unmute your microphone. For the latter, select More Options from your Teams meeting controls. Then select Show device settings. A list of options will pop up and from there you can choose the options you need, including whether or not your mic is muted.

Update the Teams Meeting device settings, source: SoftwareOne

Empower your employees with Teams

Knowing your way around the mute function in Teams is essential. You can mute other people or, perhaps more importantly, you can mute yourself. A note on etiquette here: it is considered good form to mute yourself when you are not talking. Nobody wants to hear you breathing or be distracted by noises around you that you cannot control (hello again, microwave popcorn and garbage truck outside your window.)

A black background with blue lines on it.

Prepare your remote workers for change

Our Adoption Change Management team can help your remote workers learn to love new technology.

Prepare your remote workers for change

Our Adoption Change Management team can help your remote workers learn to love new technology.

Author

Erik Moll, SoftwareOne blog author

Erik Moll
Go-to-Market Manager - Americas

Digital Workplace